Category Archives: gaming

StarCraft II CPU Benchmarking with AMD CPU vs Spoofed Intel CPU

There’s been quite a bit of fuss in the past about Intel’s C++ compiler and how it unfairly performs worse on non-Intel hardware, and it’s been proven in quite a few scenarios. The most popular discussion area about this is Agner`s CPU blog.

So out of curiosity, I decided to check if StarCraft II was affected by this. I installed VMware Player, installed a copy of Windows 8 (64-bit; didn’t have a 32-bit image lying around), did some minor tweaking, figured out how to CPU spoof (pro-tip: you need Virtualization enabled under host BIOS), and installed StarCraft II. Specific hardware and software testing conditions can be found at the bottom of this post.

I did three different tests. The first test was me first observing the framerate when looking right at the main base without moving the camera, and just selecting the nearest mineral node. The first test also included me creating 25 Zealots and moving them into a corner. StarCraft II had an unfinished update during this process, and I also had all my normal background applications opened on the host operating system.

The second test was the same, but StarCraft II was fully updated, and all background applications on the host operating system were closed.

The third test was me observing 208 Zerglings in a corner, with all background applications closed.

I chose those methods of testing because I wanted a simple test that was both consistent and reproducible without too much room for variance.

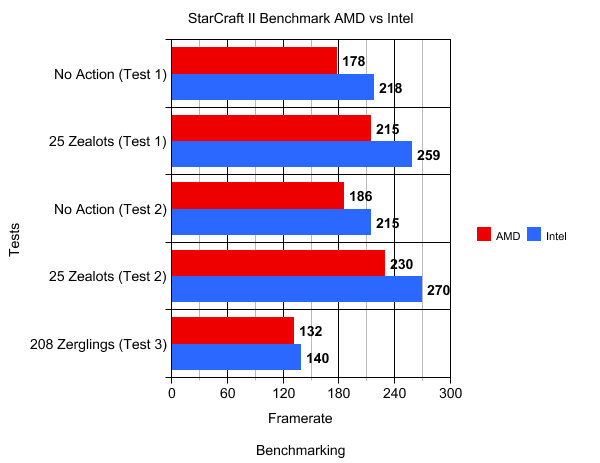
The framerates did vary a good bit between processors. The framerates reported on the graph is the average framerate. These are particularly interesting results, considering the Intel processor I was spoofing was actually worse than the FX-8350.


Now for the specifics. Here is the hardware and software present on the host operating system:

Graphics: MSI R7850 Twin Frozr 2GD5/OC (1120MHz Core, 1200MHz Memory, Xtreme-G 14.12 Omega drivers)
Processor: AMD FX-8350 (8 cores @ 4.5GHz, no Turbo Core)
Power Supply: Rosewill Green Series RG630-S12 630W
Monitors: Acer S201HL (3x all at 1600×900@75Hz)
Operating System: Microsoft Windows 10 Pro Technical Preview Version 10.0.9926 (64-bit)
Memory: G.SKILL Sniper 8GB (2x4GB, F3-10666CL9D-8GBSR, default speed/timings)
Audio: ASUS Xonar DG (UniXonar drivers)
VMware: Player (7.0.0 build-2305329)

And the hardware and software present on the guest operating system:

Memory: 3GB
Processors: 4 cores
Graphics: VMware SVGA 3D (1GB VRAM, 8.14.1.51 driver version)
Display: 1024×768
Operating System: Microsoft Windows 8.1 Pro Version 6.3.9600 (64-bit)
CPU-Z Report for AMD CPU
CPU-Z Report for Spoofed Intel CPU

StarCraft II Specifics:

Version: 2.1.8.33553
Graphics: 1024×768, Low Texture Quality, Low Graphics Quality
Sound: 128 Sound Channels
Voice: Disabled Voice Chat
Map: $$$Fastest TvB$$$ v1.1 by truenoob

Test 1 Specifics:

– All background applications (Steam, Evolve, Plex Media Server, MSI Afterburner + RTSS, puush) were running on the host operating system.
– StarCraft II was playable, but had an incomplete update (was last updated in middle of December 2014).
– Test occurred during solo-play on the bottom-section of the map.
– Played as Protoss.
– First test involved selecting the nearest mineral node, centering the mouse cursor on it, and observing the frame rate. The camera was not moved at all.
– Second test involved creating 25 Zealots. I put all builders on the same mineral node, took one builder, moved straight-down from the Nexus, built 5 Pylons, and put 3 Gateways on the sides of the Pylons (6 altogether). Builder was placed in the middle of the buildings. I then created Zealots until I reached the population limit (50). All 25 Zealots were then moved to the bottom-left corner of the map until they spread out and filled the corner and the area like a triangle. Frame rate was observed for a few minutes.

Test 2 Specifics:

– All background applications on the host operating system were closed.
– StarCraft II was fully updated.
– Test was exactly the same as Test 1 after that (bottom of map, 25 Zealots).

Test 3 Specifics:

– Same as Test 2 initially (background applications closed on host, up-to-date SC2).
– Played as Zerg.
– Played on top-section of map.
– Had one geyser, 9 drones on mineral node, and 1 drone on vespene.
– 13 Overlords (all moved to top-right of map) for a population limit of 112.
– 4 Hatcheries each with their own Queen.
– Continued creating Zerglings from each Hatchery until population limit was reached.

Wired a ATX Power Supply to a Xbox 360

So I recently picked up a Xbox 360 off of eBay (got a really good deal on it for $25). Has a tiny bit of cosmetic damage, but it seems to run fine. The console didn’t come with any cables however, but I had a spare HDMI cable and controller lying around. What I didn’t have was a spare power brick though, nor a regular ATX power supply with appropriate output power.

The Xbox 360 I received is a late-model Jasper unit (last unit before the Slim models). Mine also seems to be one of the rarer ones with internal memory (512MB of it), which is pretty nice. There was save data from the previous owner on both storage devices though, so once I got the console up and running, I did a factory-reset on it (more on that in a little bit).

So, the Xbox 360 was in good looking condition, but having nothing to power it wasn’t really helpful. I started asking some people about whether they had a spare power brick, and even ran downtown to see if a few thrift stores happened to have any (unfortunately all the stores I checked were closed). Eventually a friend of mine finds a relatively decent ATX power supply that I could borrow, so I ran down his place to pick it up, along with a game. The power supply ended up being a Antec EarthWatts EA-500, and has more than enough power to run the Xbox 360 (the Jasper unit needs at least 150W, 12A on the 12V rail and 1A on 5V).

I then did a little bit more research into how to actually hook the PSU up, and found that it was actually relatively simple to just use the power from the Molex adapters (preferably more than one so load can be distributed). You could also use power from the CPU power connectors, or the 20+4 cable itself if you know what you’re doing.

I used two molex connectors from the PSU, and made sure that both connectors were on separate cables. Since this wasn’t my PSU, I couldn’t just splice the wire, so I cut some female molex adapters I had lying around and used those.

On a standard molex connector, you have a yellow wire, two black wires, and a red wire. You could probably find more definite answers elsewhere as to what they do (and you probably should), but my limited understanding is that the yellow wire is positive, and the black wires are negative. Red is said to be the 5V standby.

Inside the Xbox 360 power port, you have a bottom row of three holes. Above that is another row of three holes. And on the top, you have two pins (at least on Jasper; I think early models have a single bar). The general idea is to hook the black wires on the molex connector to the bottom three holes, the yellow wires to the three holes above, and a red wire to the left pin. The right-top pin is unused (I’m unsure what it does, but similar guides seem to ignore it as well). For the six holes, jamming a thick wire into the hole should be all that’s needed for a snug connection. For the pin at top, I had to fold the wire over once to make it a little bit thicker, then I just pushed it in the space.

Since there isn’t an actual motherboard controlling the PSU on the 20+4 connector, you have to power it on via the pin short trick (aka the paper clip test method). It involves connecting the green wire to a nearby black wire.

So once everything was securely hooked up, I turned on the PSU (switch on the back), and then pushed the power button on the Xbox itself. No explosions, pops, or smoke were seen, and the Xbox powered on. Played a little bit of some Need for Speed game just to make sure the PSU could handle load, and it did without issue.

Overall, this mod turned out great, and was a nice learning process. I’m unsure how it will hold up overtime, and the general consensus from others who’ve done the mod is that such a setup shouldn’t be ran long-term for some reason. I plan on ordering a power brick at some point in the near future though, so I likely won’t keep such a setup long-term either, but it is nice to know that this is easily possible.

Now back to the factory-reset. After I verified the console works and I got it in an ideal location, I decided to try factory-resetting the Xbox, erase all content on the storage devices, and restore my profile onto it. Erasing the storage devices was simple enough. Factory-resetting however was a bit more difficult.

With a bit of searching, it seems you can factory-reset a Xbox 360 by pressing a ten-length button combination on the System Info screen. The catch is, it seems this button combination isn’t consistent between users and devices, so searching online for this combination is a gamble. May get lucky with the first combination you try, maybe the fifth, or maybe none at all.

The standard button combination begins with LT, RT, X, Y, LB, RB. The next four buttons after is what varies. I called up Xbox support and after verifying my account ownership and giving the representative my console’s serial number, I was provided with a button combination that worked (LT, RT, X, Y, LB, RB, Left, Left, Down, X; use the D-pad to enter arrow directions). I’m unsure what determines this button combination, or whether or not it changes over-time.

Once that was handled, I restored my gamer profile, and all was well after that. At some point, I plan on grabbing a copy of Warriors Orochi 3 and possibly Diablo III and playing them.

As for how I got the Xbox for $25, I decided to check eBay one day when I saw a friend selling his console, and wanted to get a general price on it. Was total luck that I saw the $25 listing, and was lucky I even got the order in for it (there was a quantity of 20 listed, I bought one, and then someone came by and bought the last seven). The seller claims he was trying to get rid of old stock to make-room for a new batch. This was the listing here.

Wanted to download StarCraft, and did it!

I wanted to play a few classic games as of lately, and StarCraft was one of those games. I lost my CD key a while back though, but a friend was kind enough to allow me to use his.

In the past, Blizzard games had a normal CD key. With the new feature of being able to add classic games to your Battle.net account however, this introduced another key. And to make matters even more interesting, the keys are not interchangeable (so only the classic CD key could be used with the classic installers, while the new Battle.net keys can only be used with the digital download installers). The key my friend gave me was the digital download version.

I knew Blizzard allowed you to download some of their game client downloaders, so I went over to their site to look for StarCraft. As it would seem however, Blizzard doesn’t allow you to download their classic games unless you have them attached to your Battle.net account.

So the next idea I had was to just find someone who had StarCraft attached to their account, have them get the downloader, and upload it somewhere for me to use. This proved a bit difficult at first, but I eventually found another friend who owned it, and he was able to provide me with the downloader. Blizzard’s ownership verification seems to stretch far however, and I was unable to use the downloader. I’m unsure how they actually verify ownership at this point.

I was curious as to what the View tab had on the downloader, but once the Error message appears, you can no longer interact with the downloader window, and pressing OK or closing the Error window results in the downloader closing. So in order to see what the View tab had, I just opened up a downloader for a game I actually had on my account (WarCraft III). There was a Connection Info option and a Log option, and both ended up providing some useful information.

So lets start with the Connection Info option. There’s a couple of interesting addresses shown here. Most notable was the rouge.blizzard.com address, but following up on that didn’t really lead to anything useful. The important bit was the Download Hash. Searching that hash on Google pulled up some torrents for the WarCraft III download.

Next is the Log option. It was less interesting, but the important bit here was the tracker address.

So the next task was to just get the Download Hash for StarCraft. I noticed there was a little bit of delay between when the downloader opened and the Error message appeared. I figured the downloader did something internet-related during that period, so I had the idea of just slowing down my connection a bit in order to delay the Error message from appearing (was as simple as just re-opening WarCraft III’s downloader). This worked surprisingly, and I was able to get to the Connection Info section.

I searched StarCraft’s download hash in Google, and managed to find a torrent for it. I also added Blizzard’s tracker announcer URL to the torrent as well, and gained some peers from it, and so far, it seems to be downloading nicely.

Once the download completed, I verified it, and installed it without any issue.

Information:
StarCraft Download Hash (enUS): 59688D4CC5EA7E2186F2651C8E87987B273972C9
WarCraft III Download Hash (enUS): BB58D8C639601EAC07AA6D6273B0F443B2836FF9
Blizzard Tracker Announcer URL: http://us.tracker.worldofwarcraft.com:3724/announce
StarCraft Magnet URL: http://pastebin.com/raw.php?i=5Z6jEV9g