- Java JDK 25, 17, and 32-bit JRE 8
- Desktop and Start Menu shortcuts
- Client uses
classpathfor loading (vsjar) - Client OpenGL/DirectX renderer libraries need 32-bit JRE
Blog
-
Void (localhost, Windows)
-
Dota 2 Pre-Crownfall and Classic! (Windows)
SteamCMD+ Goldberg Steam Emu- Offline + Unfair Bot Match instant-launch
70GB+ 7.39,50GBPre-Crownfall,14GBClassic- Pre-Crownfall is before 7.36 that introduced Hero Facets
- I think Facets enforce a predetermined play-style and makes randoming Heroes less-fun
- Classic is Source 1 (
win32DX9) - Classic is more chill and I like it! Warlock is way less-OP :p
- I had to finally look into obtaining older Dota 2 versions after the 2025 “Spring Forward” 7.39 update introduced more-complex UX with the courier and having it auto-buy (totally broke my Octraine Core flow!)
-
Dota 2 Offline + OHA Bot Scripts (Windows)
https://wiki.realmofespionage.xyz/games;windows;dota_2_steamcmd
Download Dota 2 through SteamCMD, and use high-quality bot scripts, in ultimate offline style!
- SteamCMD instead of full Steam GUI client (lighter, less telemetry)
- Goldberg Steam Emulator (satisfy Dota 2 hooks)
- Dota 2 all-official files/updates/validation
- Open Hyper AI bot scripts (easily swappable)
- Dota 2 forced-offline
- Batch files, Start Menu shortcuts
- Dota 2 launcher immediately launches into Unfair bot match
- Linux and FreeBSD too!
SteamClientDll64was the only thing I couldn’t avoid aC:\for :p -
Don’t casually mess with PATH
I like automating, and like adding folders to PATH, There’s SET, SETX, and /M that I’ve messed with over the years casually, but when setting up freenginx I randomly found my user PATH had only one folder in GUI, vs the list I was expecting. Turns out my last messings with SETX wiped out all existing folders in PATH and replaced it the single folder I specified.
Windows is cool about running no-problem with very broken user PATHs so my webserver has been running for a few days like this :p
For future installs, I’ll likely stick to setting PATHs by-hand from GUI for a bit until I start relying on more of them.
-
Less GUI, more MariaDB, Named pipe, and on-demand!
https://wiki.realmofespionage.xyz/servers;windows;games;trinitycore_3.3.5_localhost
- cmake.exe instead of cmake-gui
- Removed SQLyog; now all MariaDB
- Named pipe with MariaDB (now possible with de-couple from Service)
- Better auth/world conf separation (they need hard individual folders)
- MariaDB install no longer needs Service nor Networking!
Service replacement is starting mariadbd as-needed with the auth/worldserver and DB backup scripts - No longer need a MariaDB 500MB+ background service running/manual management!
The timeout between MariaDB server start and commands is quick, but longer DB server start-up times might need that lengthened.
-
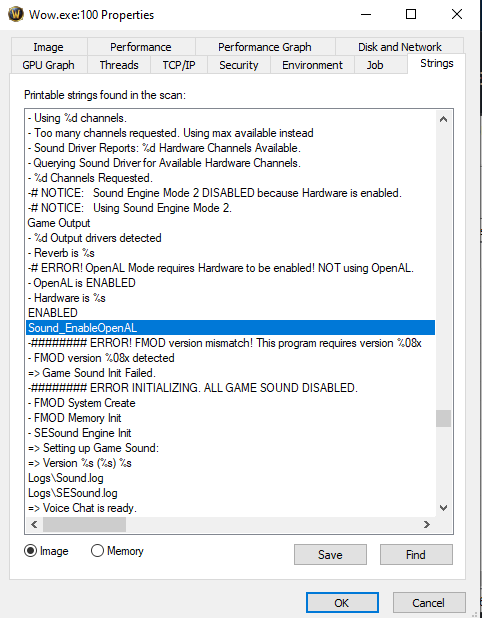
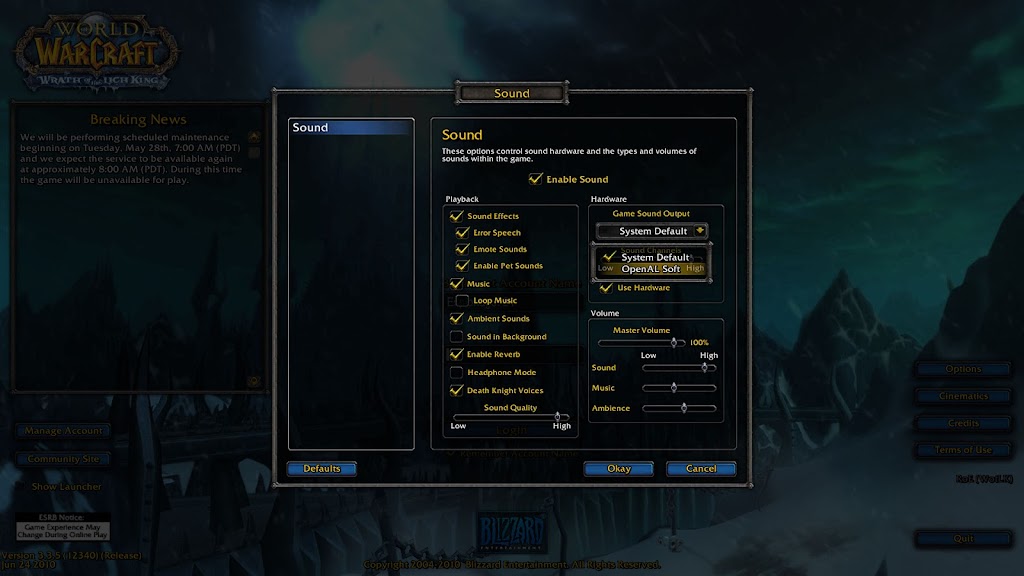
World of Warcraft WotLK 3.3.5 can do OpenAL audio

I recently set-up a private server for WoW, and have to tweak everything and anything, including an old game from back in 2010 that already runs relatively well :p
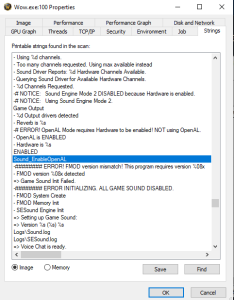
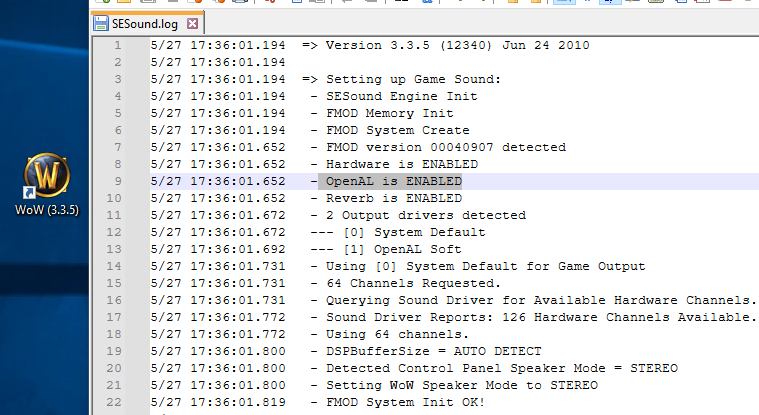
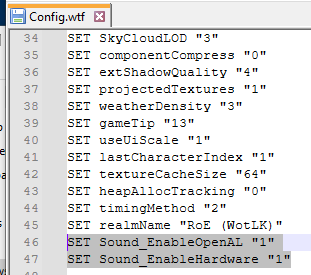
WoW by-default uses FMOD, and can’t do hardware-accelerated audio in Vista+. I was digging around some strings in Wow.exe and found references to OpenAL. Some more digging, I found the cvar “Sound_EnableOpenAL”.

Tossing that cvar into Config.wtf along with enabling Hardware acceleration allows OpenAL to be used in WoW! With the old Creative OpenAL implementation, WoW takes a few seconds longer to load to the log-in screen.
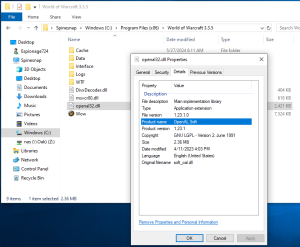
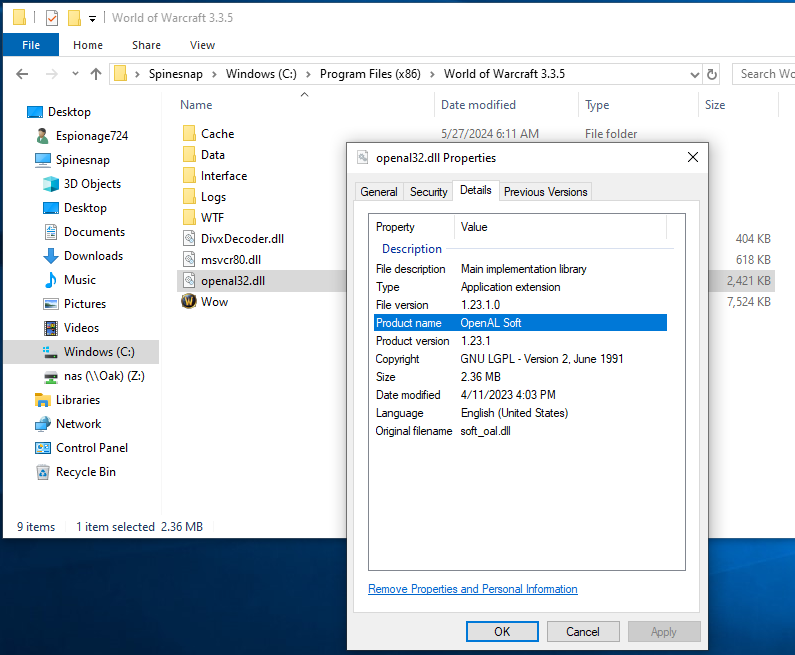
Turns out, dropping-in OpenAL Soft works no problem! SESound.log reports additional sound channels (126, but client only allows and resets to 64 max), and OpenAL Soft’s AL caps viewer reports a lot more functionality over the Creative implementation.
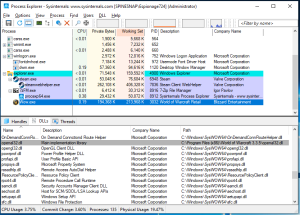
Process Explorer shows the dropped-in OpenAL Soft dll being loaded (no OpenAL dll is loaded without the cvar), and audio works in WoW.

With about 5 minutes of playing with old desktop Stereo speakers, I didn’t notice anything sounding different. Stereo sound still worked (tested by rotating near the fire in Goldshire Inn). I don’t know if there’s any advantages going through OpenAL Soft vs dsound, but this sounds like a better option for operating systems Vista+ (including 10 LTSC 21H2).
Interestingly there’s also strings mentions of ASIO, but I haven’t found a way to tangibly test or enable it. I doubt WoW 3.3.5 reasonably benefits from the lowest of low-latency audio.
-
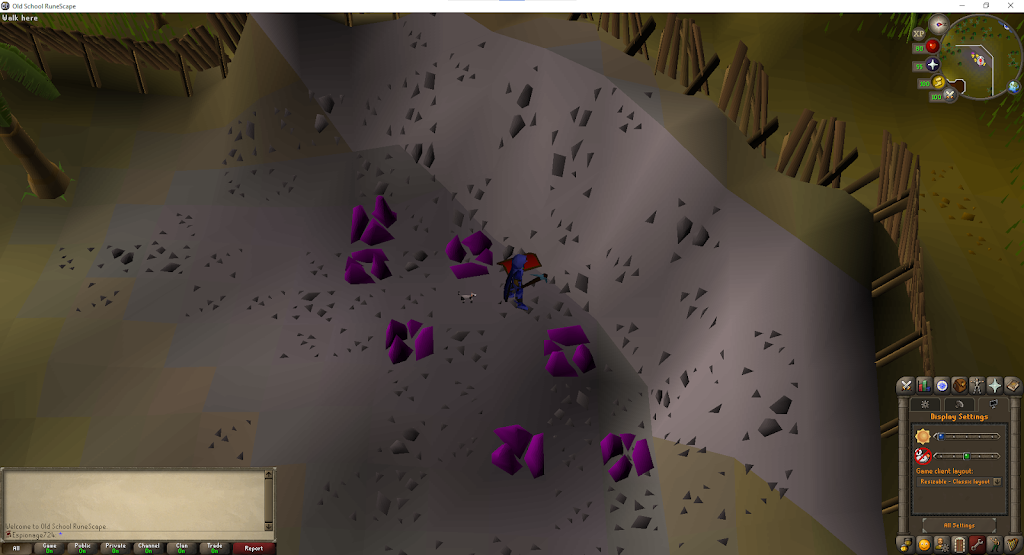
Old School RuneScape Legacy Java Client vs New Official Client (C++) Brightness
I was curious on a framerate test in Lumbridge castle between the Java and C++ OSRS clients, and found that there’s a notable difference in the lowest brightness of the game world, with the C++ new client being slightly brighter (screenshots at the bottom; I recommend new Tabs to switch between for comparisons).
There are other subtle differences too like the camera distance (both are at default), the minimap, and fine details on the grass tiles on the outer-edge around the fences. On the top-left-most Gem rocks, the outer-left rock’s shadow loses some gradient and fine details on the shadow on the that are seemingly “smoothed-out” on the C++ client.
I prefer the Java client’s more saturated colors and the harder-red. I’ve played from the Java client at 50 FPS for years and I’m used to it (along with needing no extra features from the C++ client), but I got used to that smooth camera movement with GPU acceleration.
I’m playing from the Java client again currently (Jagex Launcher), and after a few days I haven’t felt the need to switch back to C++. Black colors actually being black and other colors being saturated is nice! You can find my RuneScape hiscores and screenshots here.
Legacy Java Client:

New Official Client (C++):
")
-
Different compression formats for initramfs vs uncompressed
I’ve been working on improving boot times lately. I was doing uncompressed images in dracut.conf on the assumption that loading is faster without involving decompression, but I never tested this theory until now.
First I generated the images, got the final size, and the amount of time it took to create the images. This is handled by:
clear && sudo -e ‘/etc/dracut.conf.d/99-custom.conf’ && sudo time dracut –force –regenerate-all && sudo time lsinitrd | grep ‘Image:’
Next, I rebooted and immediately ran systemd-analyze
In-short, my theory was right with cat (uncompressed) coming in first at 15.112s, but gzip, lzo, and lz4 were still within 15 seconds and are half the file-size!
Testing done on a Dell Latitude 5591 (BIOS 1.32), openSUSE Tumbleweed (GNOME, 6.8.8-1-default), i5-8400H, SK hynix Gold P31 (1TB), UEFI mode, unencrypted with root on ext4.
cat
52M
3.13user 1.35system 0:04.18elapsed 107%CPU
0.25user 0.45system 0:00.41elapsed 169%CPU
Startup finished in 4.491s (firmware) + 603ms (loader) + 452ms (kernel) + 3.874s (initrd) + 5.691s (userspace) = 15.112s
graphical.target reached after 5.690s in userspace.gzip
26M
11.61user 1.28system 0:05.05elapsed 255%CPU
2.18user 0.27system 0:02.08elapsed 118%CPU
Startup finished in 4.490s (firmware) + 504ms (loader) + 621ms (kernel) + 4.266s (initrd) + 5.602s (userspace) = 15.485s
graphical.target reached after 5.601s in userspace.bzip2
26M
6.82user 1.28system 0:07.79elapsed 104%CPU
9.31user 0.41system 0:09.19elapsed 105%CPU
Startup finished in 4.477s (firmware) + 503ms (loader) + 2.651s (kernel) + 4.274s (initrd) + 5.572s (userspace) = 17.479s
graphical.target reached after 5.572s in userspace.lzma
21M
19.94user 1.32system 0:20.89elapsed 101%CPU
5.89user 0.34system 0:05.74elapsed 108%CPU
Startup finished in 4.513s (firmware) + 486ms (loader) + 2.369s (kernel) + 4.151s (initrd) + 5.626s (userspace) = 17.147s
graphical.target reached after 5.626s in userspace.xz
23M
23.75user 1.47system 0:07.23elapsed 348%CPU
4.82user 0.34system 0:04.65elapsed 110%CPU
Startup finished in 4.592s (firmware) + 496ms (loader) + 1.450s (kernel) + 4.246s (initrd) + 5.904s (userspace) = 16.690s
graphical.target reached after 5.904s in userspace.lzo
26M
11.58user 1.35system 0:05.06elapsed 255%CPU
2.14user 0.31system 0:02.07elapsed 118%CPU
Startup finished in 4.647s (firmware) + 510ms (loader) + 631ms (kernel) + 4.004s (initrd) + 5.861s (userspace) = 15.655s
graphical.target reached after 5.861s in userspace.lz4
26M
11.60user 1.31system 0:05.06elapsed 255%CPU
2.14user 0.30system 0:02.07elapsed 118%CPU
Startup finished in 4.507s (firmware) + 507ms (loader) + 631ms (kernel) + 4.165s (initrd) + 5.891s (userspace) = 15.702s
graphical.target reached after 5.891s in userspace.zstd
25M
8.24user 1.39system 0:05.94elapsed 162%CPU
0.60user 0.45system 0:00.47elapsed 224%CPU
Startup finished in 4.500s (firmware) + 501ms (loader) + 503ms (kernel) + 4.071s (initrd) + 7.000s (userspace) = 16.577s
graphical.target reached after 7.000s in userspace. -
Seamless BitLocker Encryption and Online Key Recovery!
I was updating my laptop’s TPM firmware the other day and was using the latest 11 Insider build. I disliked the idea of disk encryption since back in 2015 when it was confusing dealing with discard/trim and LVM on Linux, and never bothered with BitLocker by association.
It was only during that TPM update that the updater warned me about needing to suspend BitLocker; I don’t know what the alternative option was but I was more interested in actually checking if I had enabled it without noticing. It was automatic, and most importantly it wasn’t noticeable up until that point.
That is how disk encryption should be done!
-
Getting More Into Cryptography, Part 1
I’ve been studying up on various methods for improving my home network security across devices, internet privacy, and encryption methods for a few months now (pretty casually though). After hearing about the awesome community-driven site privacytools.io, I decided to finally start trying to break some old habits.
The first objective I have is to break free of Google services, at least primarily. For the most part, I rely heavily on Chrome Sync, Google Voice, Gmail, Google+, and YouTube.
For Gmail, I figure I can simply just switch to another provider, and update email addresses accordingly. Two services I have in-mind are ProtonMail and Tutanota. ProtonMail seems to have a waiting list currently due to the a large volume of sign-ups lately, but Tutanota is instant-access. Both providers offer a free service, end-to-end encryption, and 1GB of storage. I don’t use email heavily for “important” matters, so 1GB should be more than enough (I’m only using about 0.6GB on Gmail currently). I want to give ProtonMail a go before deciding on which provider I want, but my short time with Tutanota was pleasant.
Update: One advantage that Tutanota has over ProtonMail is that it is open-source. ProtonMail’s waiting list is also apparently somewhat random when it comes to wait times. With both of those in-mind, I’ll accept Tutanota as my main email provider.
For a social network, I’m highly considering Friendica on a local, self-hosted machine. At quick glance, it seems all I would need is an Apache and MySQL server, and a general GUI setup process, which doesn’t seem too bad at all (I’ve set-up some WordPress and Joomla servers in the past), but I’ll have to figure out some more details on this.
I mainly used Chrome Sync for passwords, and I never really got into using things like LastPass. Two services that seem really interesting are Master Password and SuperGenPass. The idea behind those two services is that you take a “master password”, add some details to it (like a website name), and you get a hash-generated password to use. The generated passwords should be the same across all devices, and you don’t need to rely on a sync service or password vault (so basically, as long as you remember your master password, you’re good to go).
My browser of choice for a good while was Google Chrome, mainly for Chrome Sync, but also because it worked well with pretty much anything I threw at it. Firefox in-comparison has/had bad hardware-acceleration support and inconsistent video playback abilities on Linux. As I’m typing this however, I’m running Firefox 38 on Fedora 22, and my experience for the most part has been pretty good with minor issues. I may give IceWeasel a try in the future (due to some more questionable Firefox additions by Mozilla), but it being pretty behind Firefox in versions is somewhat concerning.
So pretty much, I’m in a planning phase currently. Transitioning data to new services and trying to get used to them will take a bit of time, but I’m sure it’ll pay off in the end along with being a great learning experience.
As for what I’ve done so far, I flashed my D-Link DSL-2750B modem from Verizon firmware to stock firmware. Verizon hasn’t updated the firmware on these modems since 2013, but D-Link does release updates occasionally for this device (the latest update being on 2015-03-25). Updates are nice and all, but generally speaking, I trust D-Link a little bit more than Verizon when it comes to modem firmware from a security-standpoint.
I’ve also blocked outside access to and from my Seagate NAS. I only use the NAS locally, so this isn’t a problem at all, but according to a reviewer, Seagate “reserves the right” to upload files from the NAS without consent according to the license agreement. Not sure on the validity of this claim, but better to be safe than sorry I suppose. I want to upgrade to a FreeNAS solution at some point in the future.
And finally, I’ve stopped using Windows as a primary operating system. I mainly used Windows because of gaming, but PC gaming is meaning less and less to me nowadays. I’ve been using Linux primarily for a bit now, and my distro of choice currently is Fedora.

")